
Due to some reasons, I had a task to install JunOS space on our Azure tenant, and that appeared to be not that straightforward as I thought. But definitely fun.
Prerequisites:
To make this Frankenstein alive, here are prerequisites:
1 VMware host with spare 512 GB
1 Windows host with about 2 spare TB
Microsoft Virtual Machine Converter
AzCopy
Azure tenant
Braveness and courage
Step one – VMware
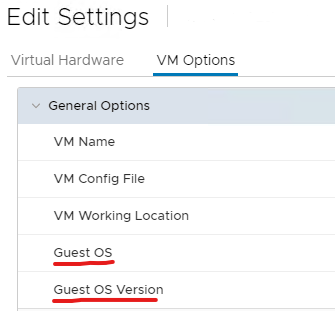
The JunOS ova file should be obtained from the Juniper support website for appliance installation as an initial step. Nothing fancy here. Download and deploy it. For me, there was only one issue when after the deployment, the VM guest itself had the wrong Guest OS and Guest OS Version attributes, so I changed them manually to be Linux \ CentOS 64x. Otherwise, the machine won’t start.
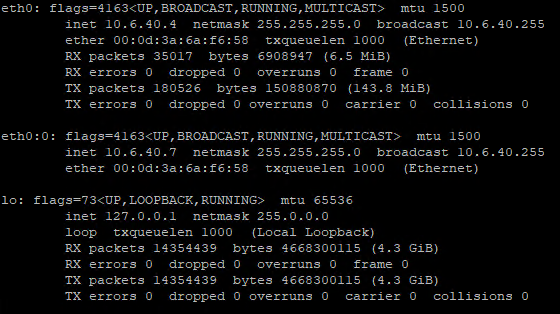
The next step is to set up the appliance, and the main catch here is that the IP address you will set up should be the same as you will have at the Azure VNet, as I failed to change it afterwards, JunOS never returned after. So let’s say your VNet is 10.0.0.0/24, which means you can select 10.0.0.10 as the interface address and 10.0.0.11 for the WebUI. So mask would be 255.255.255.0 and gateway 10.0.0.1.
Do not set up a dedicated interface for the devices, as this will use the fourth adapter (Eth3) and not all VM sizes allows you to have more than to.
Generally, we want this appliance to use only first and single interface (Eth0) and sub-interface (Eth0:0)
After the initial set-up, the following step is to prepare this CentOS machine to migrate to Azure. Generally, you can refer to this article:
https://docs.microsoft.com/en-us/azure/virtual-machines/linux/create-upload-centos
But I did only the necessary stuff, such as drives and console settings.
For drivers, I modified /etc/dracut.conf and added this line at the end:
add_drivers+=" hv_vmbus hv_netvsc hv_storvsc "And then rebuild the initramfs with this command:
sudo dracut -f -vFor the console settings, I modified /etc/default/grub and made it look like this:
GRUB:

GRUB_TIMEOUT=5
GRUB_DISTRIBUTOR="$(sed 's, release .*$,,g' /etc/system-release)"
GRUB_DEFAULT=saved
GRUB_DISABLE_SUBMENU=true
GRUB_TERMINAL="serial console"
GRUB_CMDLINE_LINUX="console=tty1 console=ttyS0 earlyprintk=ttyS0 rootdelay=300 net.ifnames=0"
GRUB_DISABLE_RECOVERY="true"
Then rebuild it:
sudo grub2-mkconfig -o /boot/grub2/grub.cfgThat should suffice to run it under Azure hypervisor.
Step two – Convertation
The next step is to convert the vmdk file to vhd, the main Azure cloud format. Before start, we need to have Azure Blob storage created and SAS token generated.
Here we will work on a windows machine and use MVMC, so install it beforehand. I was using 3 drives to make it simple. So that are D, G and E drives, each 600 GB space-wise.
Firstly, stop the VMware JunOS appliance and download vmdk and vmdk flat to the D drive. And as it’s downloading as a ZIP file, you will need to extract it first. I did save it onto D drive and extracted it to E drive.
Next, open PowerShell and import mvmc:
Import-Module "C:\Program Files\Microsoft Virtual Machine Converter\MvmcCmdlet.psd1"After that – run a convertTo command:
ConvertTo-MvmcVirtualHardDisk E:\YouVMDK.vmdk -VhdType FixedHardDisk -VhdFormat vhd -DestinationLiteralPath F:\YourVHD.vhdThen, copy this vhd to the cloud by AzCopy:
azcopy cp "F:\YourVHD.vhd" "https://storageaccount.blob.core.windows.net/container?sas" --blob-type PageBlobStep three – Azure
After you copy vhd file into the Azure Blob, you need to create a new management disk and use this image as a source:
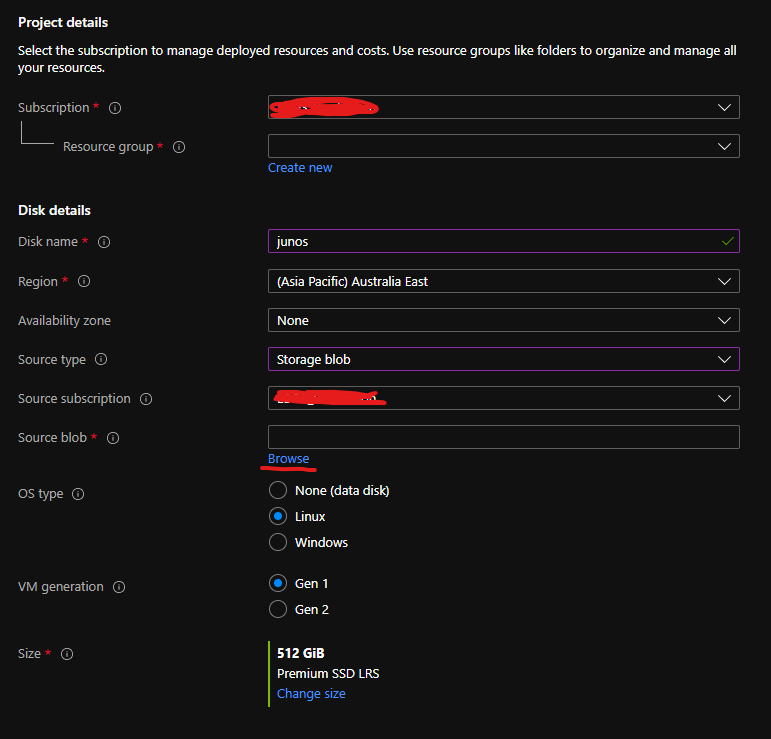
Size should be 512 GM and VM generation 1.
The next step is to create a VM out of this new management disk by simply navigating to the disk blade and creating the VM.

I choose Standard_E4s_v4 size as the closest one to the requisites from the Juniper support. And last but not least, you need to create or modify a NIC adapter connected to the created VM. This adapter should be using static IP that you specified at the begging, and have a subinterface with the WebUI IP address. If use IPs from the beginning, that would be 10.0.0.10 for ipconfig and 10.0.0.11 for the subint1
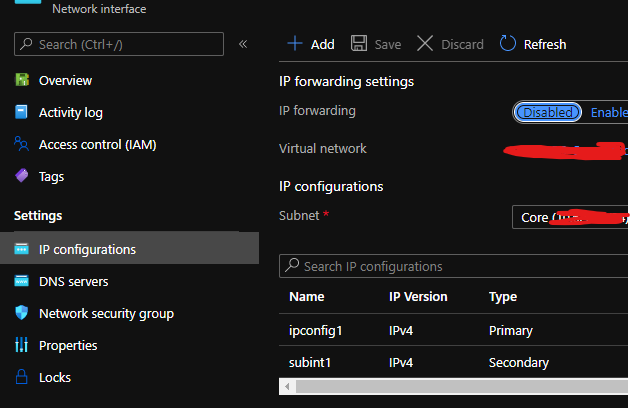
After you did this, you can run the VM and try to connect. Don’t forget to tweak NSG to align your needs.
Step four – Juniper strikes back
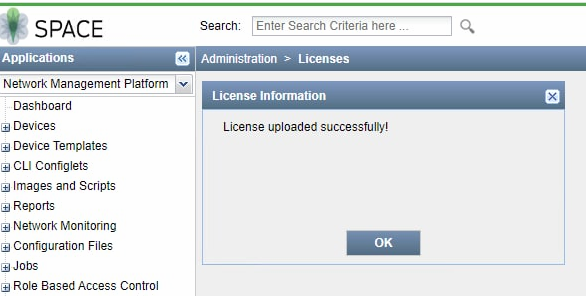
And the last step, which took the most of my nerves and time, a licensing. The licensing.
When I was excited that finally JunOS is running well and stable at Azure cloud, I faced the last boss – it wouldn’t accept our current license. So at that point, I saw this error whenever I was trying to import a key:
License upload failed!. Please check the following:
1) License data format, 2) License keys.
And the format was 100% as I tested it right before on our on-prem appliance, and it was working absolutely OK. So I started to suspect that JunOS, anyhow checking the hypervisor on which it runs and because hyper-v is not officially supported – decline the license. And I was correct, so to help JunOS trust us, we need to go deeper and tweak some records within it.
To do that, connect to JunOS by SSH and jump on to console. Then you need to connect to the MySQL database by the following command:
mysql -u jboss -pnetscreen build_db -pTo get the password for the jboss user, simply cat the password file located here – /etc/sysconfig/JunosSpace/pwd
cat /etc/sysconfig/JunosSpace/pwdcat /etc/sysconfig/JunosSpace/pwdAnd after the connection, you can check what actually JunOS sees by this query:
mysql> select HardwareModel from FABRIC_NODE;
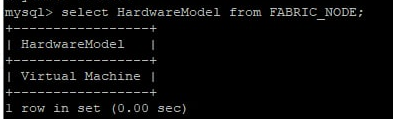
Aaand you need to change it to the right one to please JunOS and make it accept your license 🙂
update FABRIC_NODE set HardwareModel = 'VMware Virtual Platform' where HardwareModel='Virtual Machine';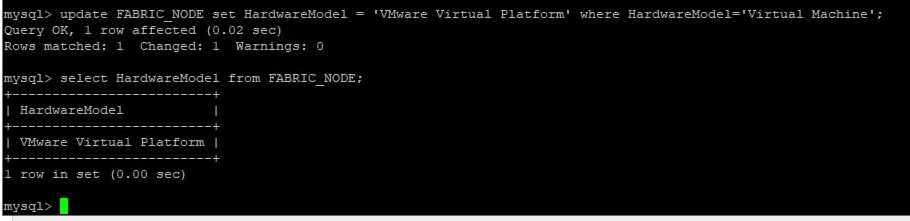
You are breathtaking 😉
Step five – Install Azure agent
To do that, you first need to add repos for yum, and since CentOS was sanitized from all unnecessary stuff we need to do some initials.
The first one is to create a repo file by vi
vi /etc/yum.repos.d/CentOS-Base.repoThen, add content into it:
[base]
name=CentOS $releasever – Base
baseurl=http://mirror.centos.org/centos/7/os/$basearch/
gpgcheck=0
enabled=1

[updates]
name=CentOS $releasever – Updates
baseurl=http://mirror.centos.org/centos/7/updates/$basearch/
gpgcheck=0
enabled=1

[extras]
name=CentOS $releasever – Extras
baseurl=http://mirror.centos.org/centos/7/extras/$basearch/
gpgcheck=0
enabled=1
And since JunOS is also controlling all the traffic pretty nazi way, we need to allow 80 and 443 ports out, for ones:
iptables -A OUTPUT -p tcp --dport 443 -j ACCEPT
iptables -A OUTPUT -p tcp --dport 80 -j ACCEPT
Then, do update, and install the Agent:
sudo yum -y update
sudo yum install python-pyasn1 WALinuxAgent
sudo systemctl enable waagent
sudo systemctl startwaagent
Conclusion:
This is not the complete guide as some parts, but this is the minimum that you need to do to run your lovely JunOS space on Azure 🙂
At this point, I face some issues with it, such as after the reboot I have to kick off some services manually.
/etc/init.d/slipstream start
/etc/init.d/redis start
Need to spend some time investigating, so probably will update this post in future.
References:
https://docs.microsoft.com/en-us/azure/virtual-machines/linux/create-upload-centos
http://blog.51sec.org/2017/03/juniper-space-issue-on-citrix-xen.html
https://nathancatania.com/posts/unlocking-or-changing-the-super-password-for-junos-space-172r1/
https://zzz.buzz/2019/08/23/convert-ova-to-vhd-for-azure-vm/
https://kb.juniper.net/InfoCenter/index?page=content&id=KB26951&cat=JUNOS_SPACE&actp=LIST